AVIDemux
Quick Links
Introduction
AVIDemux is a video processing program with lots of features hidden under the hood, but it’s main advantage is that it
can convert video and audio independently and, in some scenarios, without recoding. This is good because often we
just need to change a file extension/container eg MOV>MP4, or audio from AC3 to AAC, or fix the orientation of a video.
Other programs, such as Handbrake, would re-encode the video, creating generation-loss, as well as possibly being
time-consuming.
Listed above are some scenarios where AVIDemux is an ideal tool. It also has many other features.
Download and Installation
Download AVIDemux from here:
https://www.videohelp.com/software/AviDemux
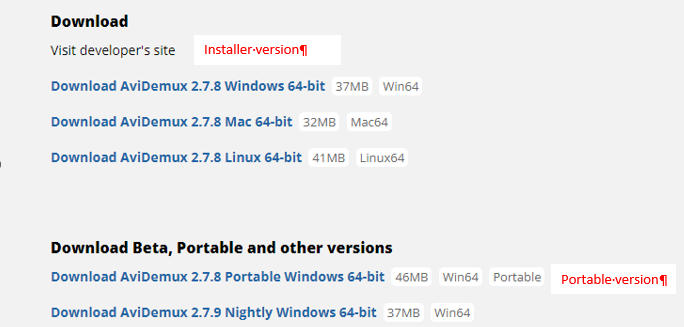
You can either download the normal, installer version, or the portable version that does not install.
The portable version does not install on your computer, it downloads as a ZIP file which must be unzipped and then the
Avidemux.exe file can be run from inside that unzipped folder. To set up the portable version, follow these steps:
Download the Portable version (the download will be a single ZIP file).
Save the ZIP file in a folder of your choosing. When the file is unzipped, a folder containing the program files will be
created inside this folder.
On the ZIP file, right-click and choose Extract All…
On the next screen, click Extract. the AVIDemux folder will be extracted from the ZIP.
To start the program, open the AVIDemux folder and double-click on the AVIDemux.EXE file.
Make a snippet of your video
You may be asked to provide a short snippet of your problem video so others can analyse it. The trick is to provide the
snippet in the original format, not re-encoded, as would happen if you used Handbrake (for example). Using
AVIDemux’s Copy-Copy feature, you’ll get a non-recoded, “original” snippet.
Set up your output options
Open the file.
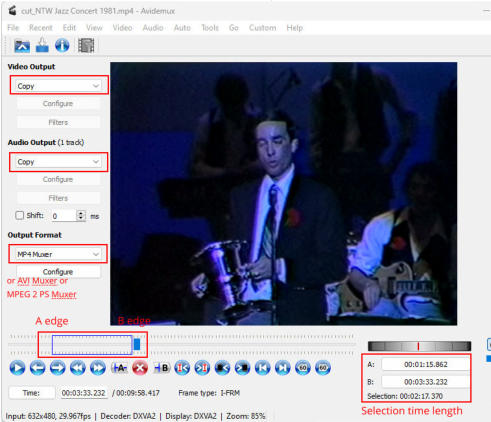
Adjust the options down the left side as follows:
Video Decoder: Leave as-is.
Video Output: Put on “Copy”.
Audio Output: Put on “Copy”.
Output Format: In the dropdown, choose the appropriate “muxer” or container/extension that is the same as your file. If
your original file is AVI, choose “AVI Muxer” from the droplist; if it is MP4, choose “MP4 Muxer”. For an MPEG file,
choose “MPEG-PS Muxer”.
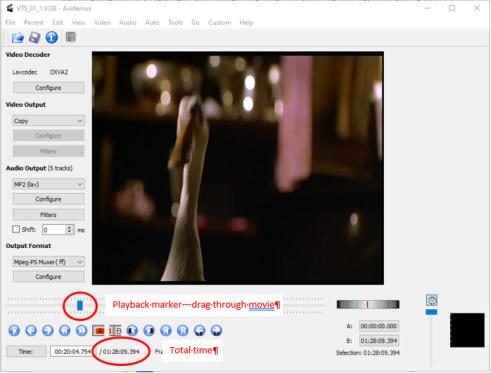
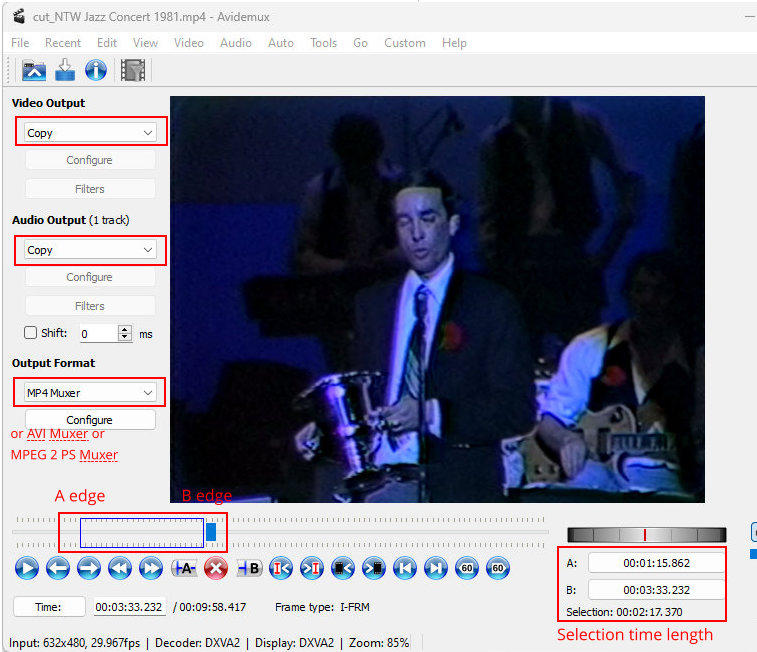
Mark your snippet
On the timeline at the bottom of the monitor, choose a short section to export as your snippet. Position the Play marker,
then use the A and B buttons to mark out a short section. You can also drag each end of the selection box. Be aware
that you will not be able to choose the exact frame for the A and B points due to the nature of the “copy”. Lossless
copying can only be made on I-frames.
For MP4s/MOVs/MPEGs, choose around 30 seconds of video. For AVIs, choose around 10-15 seconds. This will keep
the snippet file size down to a manageable level for uploading to forums such as VideoHelp, which has a 500mb limit.
Your screen should now look like this:
Now you can save your snippet by clicking File>Save or by clicking on the floppy disk icon on the top menu bar.
In a short time, you’ll have a snippet of your original file with unaltered/non-recoded video and audio.
MOV to MP4
Your video editor may not open some types of MOV files. Convert them to a more friendly format, MP4, without
recoding.
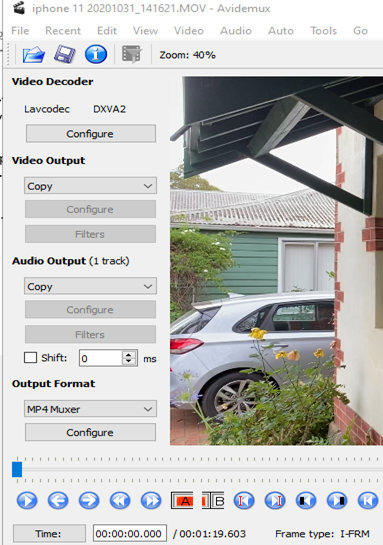
Open the file
Adjust the options down the left side as follows:
Video Decoder: Leave as-is.
Video Output: Put on “Copy”.
Audio Output: Put on “Copy”.
Output Format:
In the dropdown, choose “MP4 Muxer”
That’s it. Your AVIDemux screen should look like this:
Now set the conversion running by clicking File>Save or by clicking on the floppy disk icon on the top menu bar.
In a short time, you’ll have an MP4 file with unaltered video and audio that your editor will accept.
AC-3 Audio to AAC
Open your file
Video Decoder: Leave as-is.
Video Output: Leave as Copy
Audio: on the main Audio menu, click Select Track and untick the tracks you don't want (try using track 1 to start)
Audio Output: choose AAC (FDK)
Audio Configure: bitrate to 192
Audio Filters: Resample to 48000
Output format: MP4 Muxer
Click the Save button and in a short time you should get an MP4 video with AAC sound.
Fix Video Orientation
Note: I have discovered a scenario where AVIDemux will not rotate the flag losslessly, so this may not work. You may
have to re-encode the file to rotate it.
In these days of smartphones, when hitting the Record button in Portrait then quickly flipping the phone to Landscape,
we sometimes find the video orientation isn’t flagged correctly for your video editing program. While I know videos can
be flipped on the timeline, I have been in situations where that is unwieldy or doesn’t “hold” when other effects are
applied, and it is easier to just flip the video, external to the editor, then bring it in in the correct orientation.
AVIDemux is able to change the orientation flag without recoding the video.
Analyse: Open your file. From what you see in the AVIDemux main window, determine the rotation required to make it
right. Ignore what the file looked like in your editor or in Windows Explorer.
Video Output and Audio Output: Leave both on “Copy”
Output Format: Set MP4 Muxer
Output Format Configure button: Set the rotation to what you want it to do in the AVI Demux window (not the Explorer
or video editing program display).
If the video looks correct in AVIDemux, no further setting is required, just save it using Save As.
Save As: AVIDemux will reset the rotation flags so that the video presents correctly but otherwise not re-encode the file.
An example:
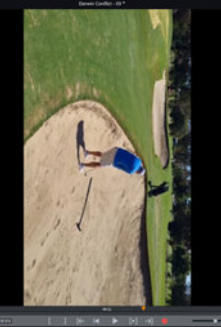
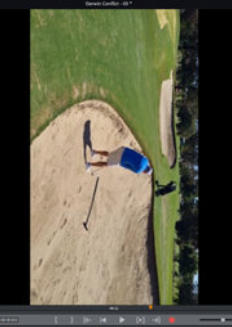
My video editor imports a video looking like this:
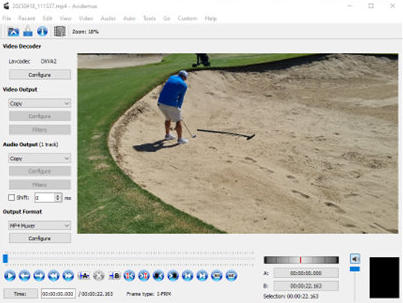
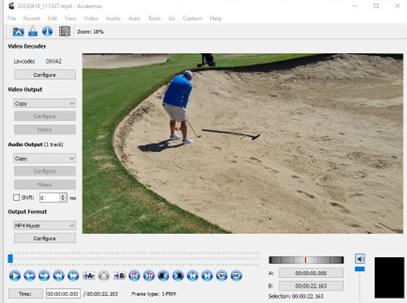
When opened in AVIDemux, it looks like this:
As the orientation is displaying correctly, simply Save As and your video’s flag will be set to Landscape.
If it displays incorrectly in AVIDemux, apply the appropriate rotation (via the Configure>Rotation button) only to make it
look correct in AVIDemux, not the other program, then Save As.
Convert multiple VOBs to a Single MPG
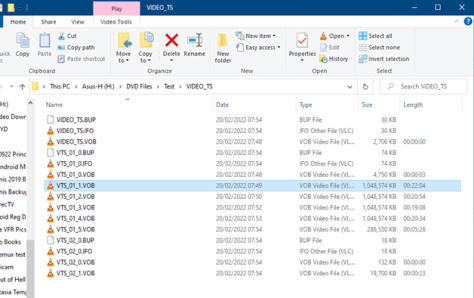
AVIDemux will join together sequentially-named files such as VOBs that have been ripped from a DVD onto your hard
drive such as:
In this case, the sequential VOBs are VTS_01_1.VOB, VTS_01_2.VOB, VTS_01_3.VOB, VTS_01_4.VOB and
VTS_01_5.VOB (being the main movie of this DVD).
For copyrighted DVDs, you’ll have to “rip” the DVD folders/files to your hard drive using appropriate ripping software.
For non-copyrighted DVDs (eg home videos), simply insert the DVD into your DVD drive, then “open” the DVD in
Windows file explorer (on the DVD drive, right-click “expand” to display the VIDEO_TS folder. Copy the VIDEO_TS
folder across to a suitable system hard drive.
After the VIDEO_TS folder is on your hard drive, proceed as follows:
Click File>Open
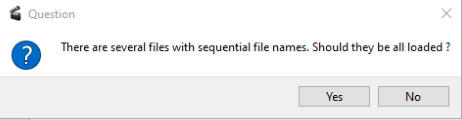
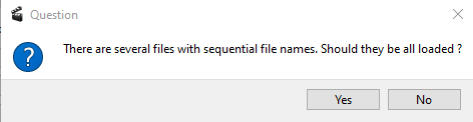
Click on the first file of the main movie sequence ie VTS_01_1.VOB, click Open and AVIDemux will present this
message:
This signifies that AVIDemux has detected the other files in the VOB set, being 01_2, 01_3 and so on.
Click “Yes”.
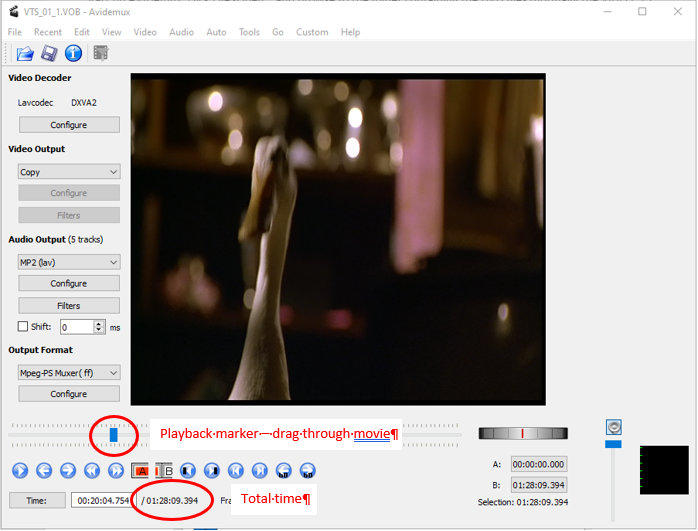
The combined VOBs will be shown as the movie:
With the combined files on the timeline, configure the export:
Video Decoder:
Leave as-is.
Video Output:
Ssince VOBs are a subset of the MPEG 2 format, no change is necessary here so leave as-is ie “Copy”.
Audio (Main Menu Tab)>Select Track:
Some DVDs have multiple audio tracks which may not be compatible with the MPG output format. On the main Audio
menu, choose “Select Track” and tick only Track 1 (which should be the main audio track).
Audio Output:
If you don’t need to change the audio format, then leave this on “Copy”.
If you do need to change the audio format (say if your video editor cannot open files with AC3 audio) then, back on the
left hand side now, in the Audio Output droplist choose MP2 (lav).
Audio Output Configure: Change the MP2 bitrate to at least 224.
Audio Output Filters: Tick Resampling and type in 48000, tick Remix and choose “Stereo”.
Output Format:
From the dropdown, choose Mpeg-PS Muxer (ff).
That’s it, now do a Save As and in a short time you’ll have a single MPEG 2 file that you can play as-is in all players, or
you can import into a video editor for further editing. Only the audio will be recoded (if you have chosen to do so); the
video will be losslessly processed into MPG.
You can, of course, save/export your video in some other format, such as MP4, using the video and audio droplists,
configure and filter buttons.

AVIDemux
Quick Links
Introduction
AVIDemux is a video processing program with lots of
features hidden under the hood, but it’s main
advantage is that it can convert video and audio
independently and, in some scenarios, without
recoding. This is good because often we just need to
change a file extension/container eg MOV>MP4, or
audio from AC3 to AAC, or fix the orientation of a
video. Other programs, such as Handbrake, would
re-encode the video, creating generation-loss, as
well as possibly being time-consuming.
Listed above are some scenarios where AVIDemux
is an ideal tool. It also has many other features.
Download and Installation
Download AVIDemux from here:
https://www.videohelp.com/software/AviDemux
You can either download the normal, installer
version, or the portable version that does not install.
The portable version does not install on your
computer, it downloads as a ZIP file which must be
unzipped and then the Avidemux.exe file can be run
from inside that unzipped folder. To set up the
portable version, follow these steps:
Download the Portable version (the download will be
a single ZIP file).
Save the ZIP file in a folder of your choosing. When
the file is unzipped, a folder containing the program
files will be created inside this folder.
On the ZIP file, right-click and choose Extract All…
On the next screen, click Extract. the AVIDemux
folder will be extracted from the ZIP.
To start the program, open the AVIDemux folder and
double-click on the AVIDemux.EXE file.
Make a snippet of your video
You may be asked to provide a short snippet of your
problem video so others can analyse it. The trick is
to provide the snippet in the original format, not re-
encoded, as would happen if you used Handbrake
(for example). Using AVIDemux’s Copy-Copy
feature, you’ll get a non-recoded, “original” snippet.
Set up your output options
Open the file.
Adjust the options down the left side as follows:
Video Decoder: Leave as-is.
Video Output: Put on “Copy”.
Audio Output: Put on “Copy”.
Output Format: In the dropdown, choose the
appropriate “muxer” or container/extension that is
the same as your file. If your original file is AVI,
choose “AVI Muxer” from the droplist; if it is MP4,
choose “MP4 Muxer”. For an MPEG file, choose
“MPEG-PS Muxer”.
Mark your snippet
On the timeline at the bottom of the monitor, choose
a short section to export as your snippet. Position
the Play marker, then use the A and B buttons to
mark out a short section. You can also drag each
end of the selection box. Be aware that you will not
be able to choose the exact frame for the A and B
points due to the nature of the “copy”. Lossless
copying can only be made on I-frames.
For MP4s/MOVs/MPEGs, choose around 30
seconds of video. For AVIs, choose around 10-15
seconds. This will keep the snippet file size down to
a manageable level for uploading to forums such as
VideoHelp, which has a 500mb limit.
Your screen should now look like this:
Now you can save your snippet by clicking
File>Save or by clicking on the floppy disk icon on
the top menu bar.
In a short time, you’ll have a snippet of your original
file with unaltered/non-recoded video and audio.
MOV to MP4
Your video editor may not open some types of MOV
files. Convert them to a more friendly format, MP4,
without recoding.
Open the file
Adjust the options down the left side as follows:
Video Decoder: Leave as-is.
Video Output: Put on “Copy”.
Audio Output: Put on “Copy”.
Output Format:
In the dropdown, choose “MP4 Muxer”
That’s it. Your AVIDemux screen should look like
this:
Now set the conversion running by clicking
File>Save or by clicking on the floppy disk icon on
the top menu bar.
In a short time, you’ll have an MP4 file with
unaltered video and audio that your editor will
accept.
AC-3 Audio to AAC
Open your file
Video Decoder: Leave as-is.
Video Output: Leave as Copy
Audio: on the main Audio menu, click Select Track
and untick the tracks you don't want (try using track
1 to start)
Audio Output: choose AAC (FDK)
Audio Configure: bitrate to 192
Audio Filters: Resample to 48000
Output format: MP4 Muxer
Click the Save button and in a short time you should
get an MP4 video with AAC sound.
Fix Video Orientation
Note: I have discovered a scenario where AVIDemux
will not rotate the flag losslessly, so this may not
work. You may have to re-encode the file to rotate it.
In these days of smartphones, when hitting the
Record button in Portrait then quickly flipping the
phone to Landscape, we sometimes find the video
orientation isn’t flagged correctly for your video
editing program. While I know videos can be flipped
on the timeline, I have been in situations where that
is unwieldy or doesn’t “hold” when other effects are
applied, and it is easier to just flip the video, external
to the editor, then bring it in in the correct
orientation.
AVIDemux is able to change the orientation flag
without recoding the video.
Analyse: Open your file. From what you see in the
AVIDemux main window, determine the rotation
required to make it right. Ignore what the file looked
like in your editor or in Windows Explorer.
Video Output and Audio Output: Leave both on
“Copy”
Output Format: Set MP4 Muxer
Output Format Configure button: Set the rotation
to what you want it to do in the AVI Demux window
(not the Explorer or video editing program display).
If the video looks correct in AVIDemux, no further
setting is required, just save it using Save As.
Save As: AVIDemux will reset the rotation flags so
that the video presents correctly but otherwise not
re-encode the file.
An example:
My video editor imports a video looking like this:
When opened in AVIDemux, it looks like this:
As the orientation is displaying correctly, simply
Save As and your video’s flag will be set to
Landscape.
If it displays incorrectly in AVIDemux, apply the
appropriate rotation (via the Configure>Rotation
button) only to make it look correct in AVIDemux, not
the other program, then Save As.
Convert multiple VOBs to a Single MPG
AVIDemux will join together sequentially-named files
such as VOBs that have been ripped from a DVD
onto your hard drive such as:
In this case, the sequential VOBs are
VTS_01_1.VOB, VTS_01_2.VOB, VTS_01_3.VOB,
VTS_01_4.VOB and VTS_01_5.VOB (being the
main movie of this DVD).
For copyrighted DVDs, you’ll have to “rip” the DVD
folders/files to your hard drive using appropriate
ripping software.
For non-copyrighted DVDs (eg home videos), simply
insert the DVD into your DVD drive, then “open” the
DVD in Windows file explorer (on the DVD drive,
right-click “expand” to display the VIDEO_TS folder.
Copy the VIDEO_TS folder across to a suitable
system hard drive.
After the VIDEO_TS folder is on your hard drive,
proceed as follows:
Click File>Open
Click on the first file of the main movie sequence ie
VTS_01_1.VOB, click Open and AVIDemux will
present this message:
This signifies that AVIDemux has detected the other
files in the VOB set, being 01_2, 01_3 and so on.
Click “Yes”.
The combined VOBs will be shown as the movie:
With the combined files on the timeline, configure
the export:
Video Decoder:
Leave as-is.
Video Output:
Ssince VOBs are a subset of the MPEG 2 format, no
change is necessary here so leave as-is ie “Copy”.
Audio (Main Menu Tab)>Select Track:
Some DVDs have multiple audio tracks which may
not be compatible with the MPG output format. On
the main Audio menu, choose “Select Track” and tick
only Track 1 (which should be the main audio track).
Audio Output:
If you don’t need to change the audio format, then
leave this on “Copy”.
If you do need to change the audio format (say if
your video editor cannot open files with AC3 audio)
then, back on the left hand side now, in the Audio
Output droplist choose MP2 (lav).
Audio Output Configure: Change the MP2
bitrate to at least 224.
Audio Output Filters: Tick Resampling and type
in 48000, tick Remix and choose “Stereo”.
Output Format:
From the dropdown, choose Mpeg-PS Muxer (ff).
That’s it, now do a Save As and in a short time you’ll
have a single MPEG 2 file that you can play as-is in
all players, or you can import into a video editor for
further editing. Only the audio will be recoded (if you
have chosen to do so); the video will be losslessly
processed into MPG.
You can, of course, save/export your video in some
other format, such as MP4, using the video and
audio droplists, configure and filter buttons.