WinDV
Thanks
I thank Petr Mourek for continuing to publish his WinDV website.
Introduction
WinDV is a program for transfer of DV via Firewire for use in video editors. You will need a Firewire socket/capture card
installed in your computer or a MiniDV camcorder that can transfer DV over USB.
The advantage of using WinDV is that scenes can be transferred as individual files, named by the date and time the
video was taken. This is handy if you have lots of video taken on different dates and times and helps cataloguing the
videos.
In recent times (with recent versions of Windows 10 and Windows 11), WinDV has been unreliable for me, with it
unable to connect to my DV camcorders. I have therefore switched to Scenalyzer for DV transferring.
Installation
General
Download WinDV from the WinDV website linked above. It doesn’t actually install any files on your computer – it runs
as a standalone, “portable” program. Just unzip the downloaded file (right-click Extract All…) to any location on your
computer you want.
Setup
To capture DV with WinDV, do this:
1.
Start WinDV by right-clicking on the WinDV.exe file and choosing “run as administrator” (this may not be necessary
but has been suggested by some users).
2.
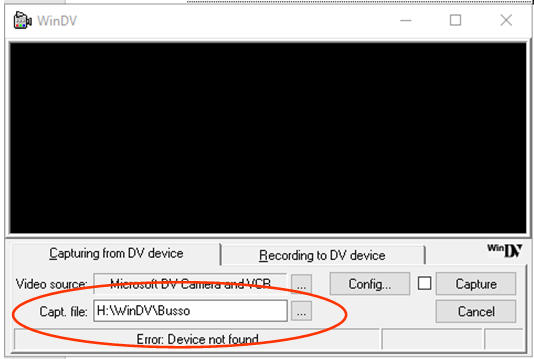
Click on “Capturing from DV device” tab. In the “Capt. file” window, click on the “…” button and browse or name a
suitable capture folder and first part of the file name (the date and time will be added by WinDV).
3.
Click the Config… button:
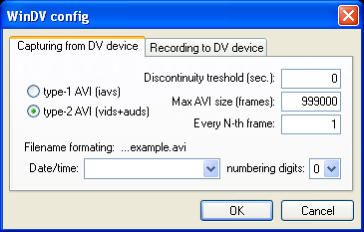
On the “Capturing from DV device” tab:
•
Tick “Type 2”.
•
Set the discontinuity threshold. This is the gap between the scenes (which are defined by the date-timestamps
on the tape) that WinDV will use to determine when to create a new file.
▪
If you want a separate file for each scene, set the threshold to 1 (being a 1 second gap).
▪
If you want to capture one day’s worth of video into 1 file, set the threshold to, say, 28800 (being 8 hours).
▪
If you want to capture the whole tape into one DV AVI file, set it to 0.
•
From the drop down list, select a suitable filenaming system (you can edit the system eg remove the dashes).
This information will be added to the “Capt. File” name you inserted on the main screen.
•
Click OK.
4.
Connect your camera and turn it on to Play mode. On the video source line, click the “…” button to select your
camera.
In the above example, I have an Canon MV800i attached via Firewire, which appears as a “Microsoft DV Camera and
VCR” (as do most of my Firewire camcorders). Choose that entry (or your actual camera name if it is listed) and click
OK.
5.
Tick the box next to the Config button to enable WinDV to start and stop the camera.
6.
I suggest that, to reduce the possibility of dropped frames, you pause your tape at the point you want to start
capturing. Your video will be visible in the window.
7.
Press “Capture”. WinDV will automatically start your tape and capture.
8.
Press “Capture” again to stop capturing.
9.
Wait until the capture button “pops out”, then click close WinDV.
10.
All going well, your captured files will be in the folder you nominated on the main screen.
Petr (the author of WinDV) has a great Help screen on his website. Click the WinDV icon on the main WinDV screen to

WinDV
Thanks
I thank Petr Mourek for continuing to publish his
WinDV website.
Introduction
WinDV is a program for transfer of DV via Firewire
for use in video editors. You will need a Firewire
socket/capture card installed in your computer or a
MiniDV camcorder that can transfer DV over USB.
The advantage of using WinDV is that scenes can
be transferred as individual files, named by the date
and time the video was taken. This is handy if you
have lots of video taken on different dates and
times and helps cataloguing the videos.
In recent times (with recent versions of Windows 10
and Windows 11), WinDV has been unreliable for
me, with it unable to connect to my DV camcorders.
I have therefore switched to Scenalyzer for DV
transferring.
Installation
General
Download WinDV from the WinDV website linked
above. It doesn’t actually install any files on your
computer – it runs as a standalone, “portable”
program. Just unzip the downloaded file (right-click
Extract All…) to any location on your computer you
want.
Setup
To capture DV with WinDV, do this:
1.
Start WinDV by right-clicking on the WinDV.exe
file and choosing “run as administrator” (this may
not be necessary but has been suggested by some
users).
2.
Click on “Capturing from DV device” tab. In the
“Capt. file” window, click on the “…” button and
browse or name a suitable capture folder and first
part of the file name (the date and time will be
added by WinDV).
3.
Click the Config… button:
On the “Capturing from DV device” tab:
•
Tick “Type 2”.
•
Set the discontinuity threshold. This is the gap
between the scenes (which are defined by the
date-timestamps on the tape) that WinDV will
use to determine when to create a new file.
▪
If you want a separate file for each scene,
set the threshold to 1 (being a 1 second
gap).
▪
If you want to capture one day’s worth of
video into 1 file, set the threshold to, say,
28800 (being 8 hours).
▪
If you want to capture the whole tape into
one DV AVI file, set it to 0.
•
From the drop down list, select a suitable
filenaming system (you can edit the system
eg remove the dashes). This information will
be added to the “Capt. File” name you
inserted on the main screen.
•
Click OK.
4.
Connect your camera and turn it on to Play
mode. On the video source line, click the “…” button
to select your camera.
In the above example, I have an Canon MV800i
attached via Firewire, which appears as a “Microsoft
DV Camera and VCR” (as do most of my Firewire
camcorders). Choose that entry (or your actual
camera name if it is listed) and click OK.
5.
Tick the box next to the Config button to enable
WinDV to start and stop the camera.
6.
I suggest that, to reduce the possibility of
dropped frames, you pause your tape at the point
you want to start capturing. Your video will be visible
in the window.
7.
Press “Capture”. WinDV will automatically start
your tape and capture.
8.
Press “Capture” again to stop capturing.
9.
Wait until the capture button “pops out”, then
click close WinDV.
10.
All going well, your captured files will be in the
folder you nominated on the main screen.
Petr (the author of WinDV) has a great Help screen
on his website. Click the WinDV icon on the main
WinDV screen to get access to his website, then