There are various video capture programs for capturing analogue video from a VCR or analogue camera such as Video 8, High 8 or VHS-C.I have found that AmaRecTV holds audio-video sync well and is relatively simple to set up.If you’re having trouble with your current capture software, try AmaRecTV.
Acknowledgements
I thank @Fleshwound from DigitalFAQ for posting valuable information on AmaRecTV, some of which I have used in this guide.
Download and Install
Download AmaRecTV from here:https://www.videohelp.com/software/AmaRecTVNote that the AMV video codec is not necessary. Other commonly available codecs that you have installed/can install can be used.The program does not install on your computer, per se. You download it as a ZIP file which must be unzipped and then the AmaRecTV.exe file can be run from inside that unzipped folder as follows:In Windows Explorer, move the AmaRecTV ZIP folder to a location of your choice, then right-click it and choose “Extract All…”. Click “Extract”. The program’s EXE file is in that extracted folder.
Setting up AmaRecTV
Introduction
Before starting AmaRecTV, connect your digitiser (“capture card”). If you need to change your digitiser when the program is running, restart AmaRecTV. If you have an internal digitiser, proceed on.The first step is to create your capture folder with Windows Explorer; you cannot create a new folder from within AmaRecTV.Ensure that you have already installed a suitable capture codec, such as the free Lagarith, HUFFYUV, UT Video or the paid MagicYUV.The setup is a relatively simple exercise, going through each tab to set up various aspects.To start the program, go to the folder you unzipped and double-click on the AmaRecTV.exe file.On AmaRecTV startup, If you don’t have your digitiser connected, or have changed it, you’ll get a message “Not found video capture device”:Connect your digitiser now. Close AmaRecTV and restart it.Access the Config screen tabs by clicking the left-most button:
General Tab
File Setting section
Click “Sel.” to browse to and set the capture folder.Type in a name for the capture file. AmaRecTV adds the date and time of capture to each file name, so there is no need to rename later captures with a new name.
Graph 1(Device) tab
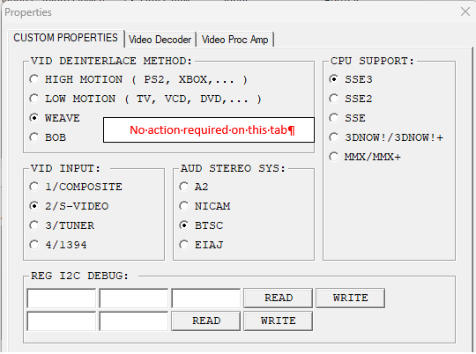
In the above example, I’m using my GV-USB2. The 713x is a PCI capture card I have in the system.In the Video Capture Device box, click your digitiser to highlight it. For HDMI digitisers, they appear only as “USB Video…”Do the same for the audio. Choose the “Analogue Capture”, not “Wavein”. HDMI Digitisers appear under various names.In the Input box, choose what you’ll be using for video input; Composite (yellow cable) or preferably, S-Video.In the Format box, for a VHS capture, choose the appropriate format as follows:PAL:720x576, 25FPS, YUY2, 16 bitNTSC:720x480, 29.97FPS, YUY2, 16 bitAudio should be on 48000, 16bit 2chIf you’re using an HDMI digitiser, other resolutions may be available and can be used depending on the source video.Click the Device Setting button. You’ll be presented with this screen:Click on the Video Decoder tab and select the video standard you are using:Note the Video Proc Amp tab. This contains the slider controls for the brightness, contrast and other adjustments which you may choose to adjust to finetune your captures. This is a representative proc amp screen:Click OK to close and go back to the main AmaRecTV Config screen.
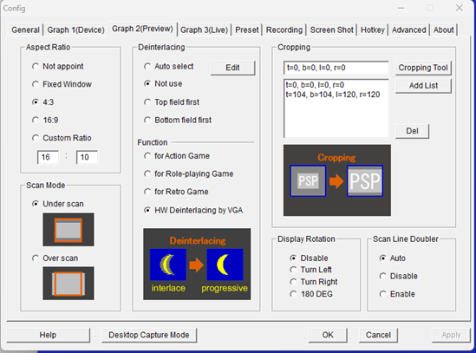
Graph 2(Preview) tab
No changes to this:
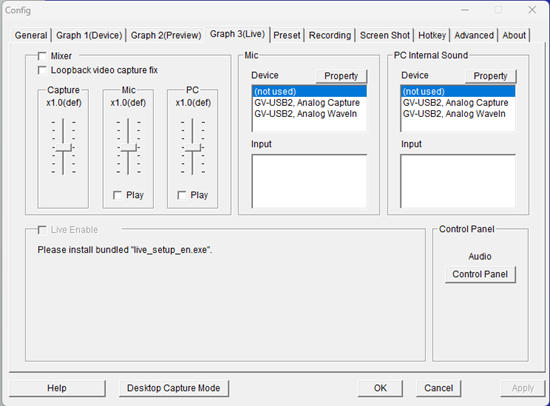
Graph 3(Live) tab
No changes to this:
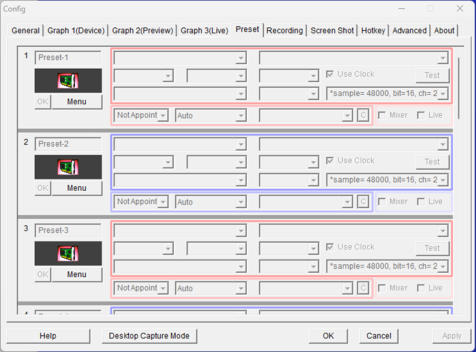
Preset tab
No changes to this:
Recording tab
Video File Setting block
Frame Rate: set to 999. That will ensure that the frame rate will be the same as you have chosen on the Device tab.Timer: if you want a timed capture (good for capturing 3 hour tapes overnight!) tick the box and enter the time required.
Video Compressor Block
Tick “Other Codec”, then down the bottom, click “Update Codec List”.From the list, click on the desired capture codec.
Audio Compressor Block
Choose “(Uncompress)”.
Screenshot Tab
No action required
Hotkey Tab
No action required
Advanced Tab
Set up as follows:Optional: In the Record Setting section, tick “make a report file”. The program will produce a post-capture report file (in TXT format) that will show, amoung other things, the locations of dropped and inserted frames. See the Problems section below for details.
Finished-Start Your Capturing
That’s it. By now, you should have the familiar blue screen or other output from your VCR/TBC/Camcorder.You can start capturing.To start capturing, click the red arrow.To stop capturing, click the red square (the red square appears when capturing commences).If your computer screen goes to sleep during a capture, when you wake it back up, you may find the AmaRecTV preview window may be frozen. If this is the case, minimise the AmaRecTV window (don’t close it!) and then maximise it. The preview video will become live.
Problems
Dropped Frames/Audio Sync
Depending on the stabilisation employed and quality of the tape, the program may drop or insert frames in an attempt to keep audio in sync. The report file will show the location of any dropped or inserted frames in the capture. This is an example portion of a report showing an inserted frame:AT=00:56:02.466s(84055f), Bsy= 0ms, Dif=-5760, Smp=9600VT=00:56:02.528s(84057f), Cap=84317f( 0D), Enc= 1.631ms, Siz= 259KB( 32%)KEY, Drp=0, (+)0, (-)0NT=00:56:02.528s(84058f), Total=1VT=00:56:02.562s(84059f), Cap=84318f( 0D), Enc= 2.618ms, Siz= 260KB( 32%)KEY, Drp=0, (+)1, (-)0VT=00:56:02.594s(84060f), Cap=84319f( 0D), Enc= 2.790ms, Siz= 259KB( 32%)KEY, Drp=0, (+)1, (-)0In this example, the duplicated/inserted frame is 84058. That is, frame 84057 and 84058 are the same frame.
Program Reset
To completely reset AmaRecTV, delete the AmaRecTV.ini file from the AmaRecTV folder and restart the program.
AmaRecTV Video Capture
Introduction
There are various video capture programs for capturing analogue video from a VCR or analogue camera such as Video 8, High 8 or VHS-C.I have found that AmaRecTV holds audio-video sync well and is relatively simple to set up.If you’re having trouble with your current capture software, try AmaRecTV.
Acknowledgements
I thank @Fleshwound from DigitalFAQ for posting valuable information on AmaRecTV, some of which I have used in this guide.
Download and Install
Download AmaRecTV from here:https://www.videohelp.com/software/AmaRecTVNote that the AMV video codec is not necessary. Other commonly available codecs that you have installed/can install can be used.The program does not install on your computer, per se. You download it as a ZIP file which must be unzipped and then the AmaRecTV.exe file can be run from inside that unzipped folder as follows:In Windows Explorer, move the AmaRecTV ZIP folder to a location of your choice, then right-click it and choose “Extract All…”. Click “Extract”. The program’s EXE file is in that extracted folder.
Setting up AmaRecTV
Introduction
Before starting AmaRecTV, connect your digitiser (“capture card”). If you need to change your digitiser when the program is running, restart AmaRecTV. If you have an internal digitiser, proceed on.The first step is to create your capture folder with Windows Explorer; you cannot create a new folder from within AmaRecTV.Ensure that you have already installed a suitable capture codec, such as the free Lagarith, HUFFYUV, UT Video or the paid MagicYUV.The setup is a relatively simple exercise, going through each tab to set up various aspects.To start the program, go to the folder you unzipped and double-click on the AmaRecTV.exe file.On AmaRecTV startup, If you don’t have your digitiser connected, or have changed it, you’ll get a message “Not found video capture device”:Connect your digitiser now. Close AmaRecTV and restart it.Access the Config screen tabs by clicking the left-most button:
General Tab
File Setting section
Click “Sel.” to browse to and set the capture folder.Type in a name for the capture file. AmaRecTV adds the date and time of capture to each file name, so there is no need to rename later captures with a new name.
Graph 1(Device) tab
In the above example, I’m using my GV-USB2. The 713x is a PCI capture card I have in the system.In the Video Capture Device box, click your digitiser to highlight it. For HDMI digitisers, they appear only as “USB Video…”Do the same for the audio. Choose the “Analogue Capture”, not “Wavein”. HDMI Digitisers appear under various names.In the Input box, choose what you’ll be using for video input; Composite (yellow cable) or preferably, S-Video.In the Format box, for a VHS capture, choose the appropriate format as follows:PAL:720x576, 25FPS, YUY2, 16 bitNTSC:720x480, 29.97FPS, YUY2, 16 bitAudio should be on 48000, 16bit 2chIf you’re using an HDMI digitiser, other resolutions may be available and can be used depending on the source video.Click the Device Setting button. You’ll be presented with this screen:Click on the Video Decoder tab and select the video standard you are using:Note the Video Proc Amp tab. This contains the slider controls for the brightness, contrast and other adjustments which you may choose to adjust to finetune your captures. This is a representative proc amp screen:Click OK to close and go back to the main AmaRecTV Config screen.
Graph 2(Preview) tab
No changes to this:
Graph 3(Live) tab
No changes to this:
Preset tab
No changes to this:
Recording tab
Video File Setting block
Frame Rate: set to 999. That will ensure that the frame rate will be the same as you have chosen on the Device tab.Timer: if you want a timed capture (good for capturing 3 hour tapes overnight!) tick the box and enter the time required.
Video Compressor Block
Tick “Other Codec”, then down the bottom, click “Update Codec List”.From the list, click on the desired capture codec.
Audio Compressor Block
Choose “(Uncompress)”.
Screenshot Tab
No action required
Hotkey Tab
No action required
Advanced Tab
Set up as follows:Optional: In the Record Setting section, tick “make a report file”. The program will produce a post-capture report file (in TXT format) that will show, amoung other things, the locations of dropped and inserted frames. See the Problems section below for details.
Finished-Start Your Capturing
That’s it. By now, you should have the familiar blue screen or other output from your VCR/TBC/Camcorder.You can start capturing.To start capturing, click the red arrow.To stop capturing, click the red square (the red square appears when capturing commences).If your computer screen goes to sleep during a capture, when you wake it back up, you may find the AmaRecTV preview window may be frozen. If this is the case, minimise the AmaRecTV window (don’t close it!) and then maximise it. The preview video will become live.
Problems
Dropped Frames/Audio Sync
Depending on the stabilisation employed and quality of the tape, the program may drop or insert frames in an attempt to keep audio in sync. The report file will show the location of any dropped or inserted frames in the capture. This is an example portion of a report showing an inserted frame:AT=00:56:02.466s(84055f), Bsy= 0ms, Dif=-5760, Smp=9600VT=00:56:02.528s(84057f), Cap=84317f( 0D), Enc= 1.631ms, Siz= 259KB( 32%)KEY, Drp=0, (+)0, (-)0NT=00:56:02.528s(84058f), Total=1VT=00:56:02.562s(84059f), Cap=84318f( 0D), Enc= 2.618ms, Siz= 260KB( 32%)KEY, Drp=0, (+)1, (-)0VT=00:56:02.594s(84060f), Cap=84319f( 0D), Enc= 2.790ms, Siz= 259KB( 32%)KEY, Drp=0, (+)1, (-)0In this example, the duplicated/inserted frame is 84058. That is, frame 84057 and 84058 are the same frame.
Program Reset
To completely reset AmaRecTV, delete the AmaRecTV.ini file from the AmaRecTV folder and restart the program.