Page Links
Introduction Types of DV Cassette Formats Methods of DV Transfer Transfer Programs Problems/TroubleshootingDon’t have a camcorder? Read this!
If you are in the market for a MiniDV camcorder to transfer your Standard Definition MiniDV tapes (not HDV or Video8/Hi8/Digital8 tapes), jump straight to and read this section. You may be able to find a camcorder that has “DV over USB” functionality, negating the need for a Firewire connection on your computer.Introduction
I use the term “DV Transfer” to refer to the general process of transferring digital video from a tape-based or hard-disk- based camcorder using Firewire (IEEE1394), “DV over USB” or Thunderbolt. This results in a like-for-like digital copy of the tape on your PC. This means that the video, which is stored digitally on the tape, is simply transferred to the computer and not digitally converted on the way. This method retains the original quality. The process runs in realtime, so a 60 minute tape will take 60 minutes to transfer. This process includes transferring of analogue Video8/Hi8 tapes when using a Digital 8 camcorder, when the analogue video is converted to DV in the camcorder and output via the Firewire port.Types of DV
As far as consumer camcorders are concerned, there are two types of DV format ie codec. The first is “DV”, meaning standard definition video (for PAL, 720x576 at 4:3 or 16:9) using a DV codec such as DVSD. The files are in the AVI container/extension. The second is “HDV”, being high definition video ie 1440x1080i, in the MPEG codec (a camcorder example being the Canon HV20). The HDV files from the HV20 are in the M2T container/file extension. The two types are completely different and require different programs to transfer. The bitrate for DV is around 13GB/hour. The bitrate for HDV is also around 13GB/hour, despite the higher resolution, because the MPEG compression of HDV is more efficient.Cassette formats
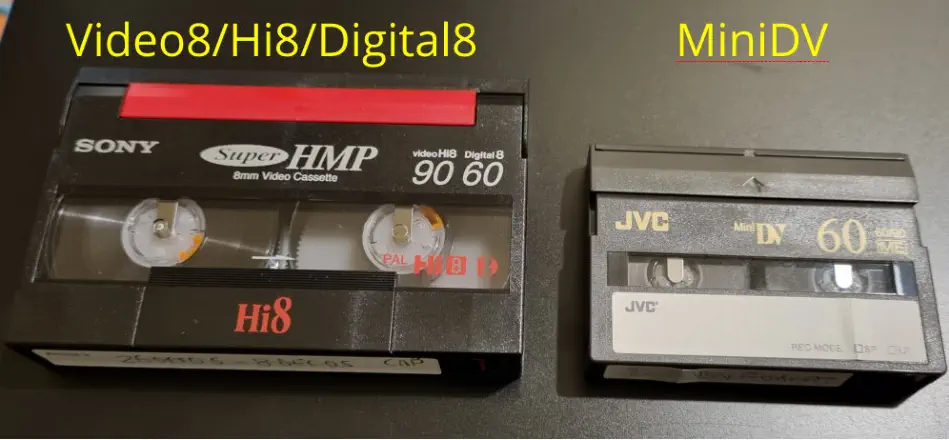
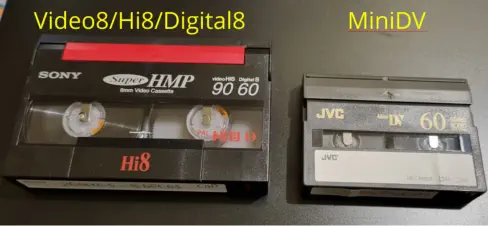
The two cassette formats are:Digital 8
This cassette is the same as the Video8 and VideoHi8 cassettes and was implemented as a digital replacement to the video8 and VideoHi8 formats. Digital 8 camcorders record the video in digital format on these cassettes. Some Digital 8 camcorders can play Video8 and VideoHi8 tapes, converting the analogue video to DV in the camcorder, allowing transfer using Firewire.MiniDV
This cassette is smaller and can be used in both a standard definition camcorder and high definition camcorder.Methods of DV Transfer
Firewire
For some general information on Firewire, David Knarr has an expose on his Studio1 website. Be advised though that it does contain errors. Warning There have been instances of camcorders, in particular the Canon HV series of HDV camcorders, being “fried” due to improper plugging of cables. This is because the 6-pin plug carries power, and if the plugs are forced in the wrong way, the camcorder could be zapped. Be very careful when plugging in at both ends (camcorder and PC) to ensure the plug/s is/are oriented correctly. I always switch off the camcorder before connecting.Requirements
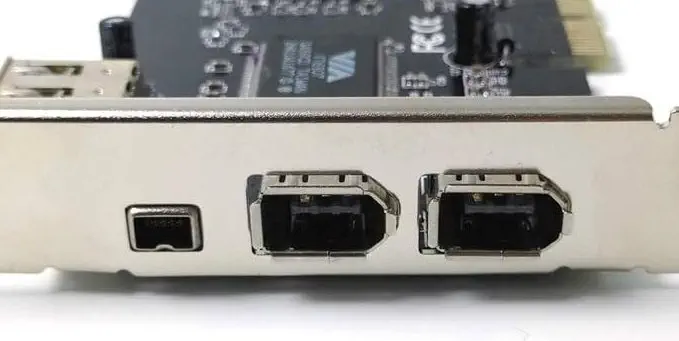
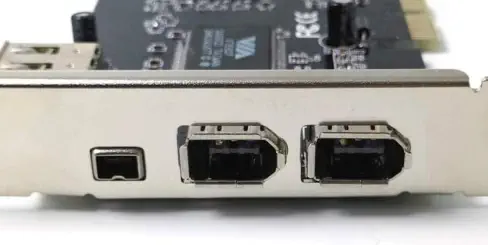
Your computer must have a Firewire/IEEE1394 port provided by a built-in port or a PCI/PCIe expansion card. If you are comfortable with adding PCIe cards to your computer, cheap Firewire cards are available from Amazon. I have a link to one such card in the Windows 11 section below. There are two Firewire standards: IEEE1394A and 1394B. The A standard is 400mb/sec and the later B standard is 800mb/sec. I don’t have any evidence to back up my hunch, but I suggest that 1394A (400mb/sec) cards are used. They are the cards with the small, 4-pin rectangular socket and the larger 6-pin socket which has a pointed top, similar to this: There are combination cards that have also have the newer Firewire-800 socket but I suggest not using those unless needed for a different device. Installation of the card is straightforward: with the PC off, plug it into any available PCI/e slot, depending on the exact card type, then reboot your PC.Windows 7
You should have no issues with connecting Firewire/DV video cameras.Windows 8/8.1
If you have problems connecting and accessing your DV camera, read this Microsoft article.Windows 10
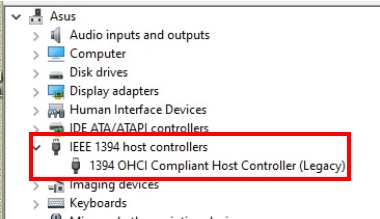
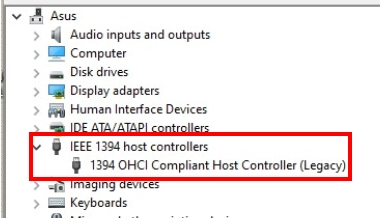
Windows 10 is a bit of a problem child when it comes to Firewire. It ships with a driver that doesn’t work in many cases, and people have found that installing the “legacy” driver will get Firewire working. David Knarr has done extensive testing and concluded that a VIA-based firewire card is best for Win 10. Device Manager is the best location to see your Firewire driver details. This is the Windows 10 Default Firewire setup (I have an on-motherboard TI “card” in this particular machine): This is the Legacy driver for Windows 10 (the recommended driver if the default doesn’t work). Note the “(Legacy)” word: To install the legacy driver, follow the Startech Procedure here.Windows 11
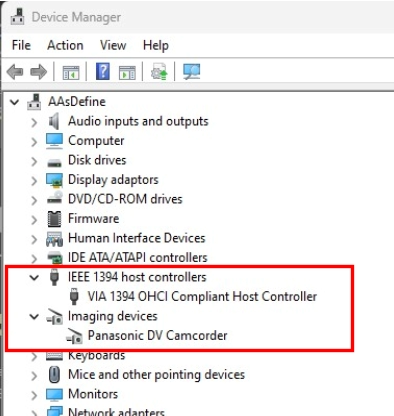
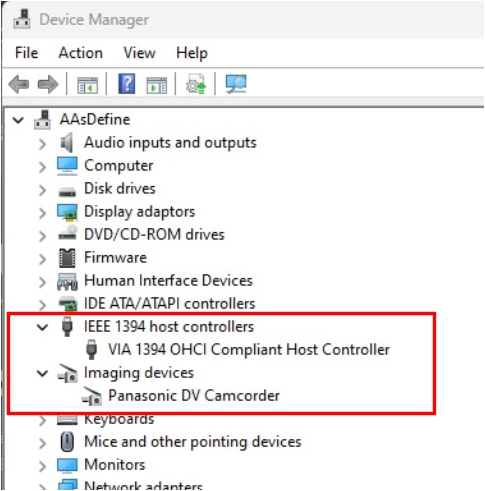
Windows 11 appears to have improved support for Firewire, with no user action required to enable a Firewire card. As soon as Windows boots with the new card installed, the correct driver will be loaded. The current recommendation for Firewire cards in Win 11 is for a VIA chipset-based card. VIA cards can be identified by the letters “VIA” on the main chip, or “VIA” or “VT6315” in the description. The Firewire card which I have installed in my Win 11 PC and which worked “out of the box” is this cheap VIA-based card from Amazon, the Tunghey VIA PCIe Firewire card. I did not install the “legacy” Firewire driver. I simply installed the card and switched my computer on. This is my Device Manager entry (also observe the Imaging devices item; here, I have a Panasonic DV camcorder attached): It is worth noting that I initially fitted a Startech Firewire card (TI chipset-based) but I couldn’t get it to function at all.Firewire Cards that work with Win 10 and 11
The following cards are known to work without issues with Win 10 and Win 11 (no driver changes required): • Tunghey VIA PCIe card (or similar should be OK; note “VIA” on the main chip) • Linkstek VIA PCIe card (has the VIA VT6315 chip) and the same card on the AUS Amazon site.DV over USB - Direct from Camcorder
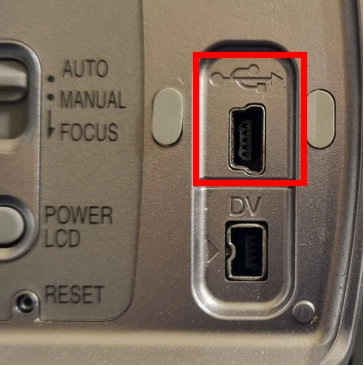
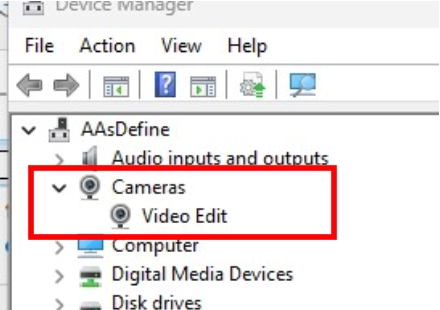
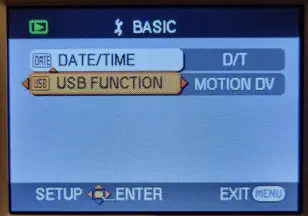
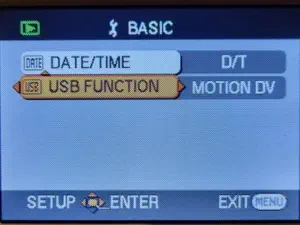
Some SD camcorders (not HDV) are able to output DV-over-USB. I have successfully tested DV-over-USB with the Panasonic NV-GS25 and GS300. The USB cable requires a USB type Mini B male plug for the camcorder and a USB type A male plug for the computer. For Panasonic camcorders, ensure the USB output is set to “Motion DV”: If your camcorder has a USB Mini B socket like this: I suggest you try plugging it into your computer; you may just be lucky enough to have a camcorder that will do DV- over-USB. After the camera has installed (no user drivers are necessary; Windows will provide them), check Device Manager for the “Video Edit” entry as shown here: This workflow is an option for laptops that don’t have a Firewire port. Use Scenalyzer to transfer. The camcorder will appear in the Scenalyzer Input droplist as “Video Edit”. For more information on DV-over-USB, see this YT video, which includes a list, in the description, of the camcorders known to have this feature.DV over USB - Pinnacle 500-USB and 710-USB
These analogue capture devices have the ability to transfer DV-using-USB, in a similar fashion to DV-over-USB, as described above. To summarise, the camcorder is connected to the 710-USB with Firewire and the 710-USB is connected to the PC with it’s USB cable. No special software is required, apart from the Pinnacle driver from here (use the Windows 7 64bit driver, assuming your system is 64 bit). While “710-USB” appears in the Scenalyzer device list, ensure you use the standard “Microsoft DV camera and VCR” device, as shown here: This workflow is an option for laptops that don’t have a Firewire port. Regarding the 710-USB, unfortunately, in my experience, for analogue capture it is becoming increasingly unreliable in Windows 10 and 11 and I cannot recommend it for that. It does however work well as a DV-over-USB device.DV over Thunderbolt
According to this Youtuber (and others), it is possible to set up a chain of cables (Camcorder>FW400>FW800>Thunderbolt 2>Thunderbolt 3>PC) that will allow a DV transfer into a Thunderbolt 3 port, depending on what model CPU you have. Read the video comments for more information on that. If you do not have access to any of the previous methods, this would be worth checking out. For Thunderbolt 4 machines, this option may no longer be available, as described here.Transfer Programs
For DV
My recommendation for standard definition DV transfer is Scenalyzer. It has proven to be the most reliable and also has some handy DV editing features such as splitting, trimming and joining clips. WinDV, for many years a great DV transfer program, was unreliable for me for a time with the later versions of Windows 10 but has recently started working correctly again with Windows 11. It is a less-featured program than Scenalyzer but does do DV transfer well.For HDV
Use HDVSplit.Problems/Troubleshooting
I have a MiniDV or Digital 8 camcorder but no Firewire
Depending on the features of your camcorder, if you don’t have a Firewire socket on your PC and you can’t fit one, and you can’t use “DV-over-USB” as described above, you will be able to do an analogue “capture” using a USB digitiser such as the IO Data GV-USB2 (I have one and it works very well for analogue video captures). The capture quality is on a par with a DV transfer. In this case, the workflow follows the usual analogue capture workflow: Camcorder>S-Video cable (preferably, or else the yellow Composite cable) + audio > digitiser > PC. A DV transfer is preferable though. Here’s an example of a DV transfer (on the left) verses an analogue capture (on the right) of a MiniDV tape:DV camera not showing up in your transfer program
• If using Windows 10 or 11, check that Windows has been given permission to use your camera and microphone: Windows Settings>Privacy & Security>Camera>turn on camera access and lower down the page, turn on “Let desktop apps access your camera”. Do the same for the microphone (click on Privacy and Security in the left margin to return to the main screen to access the Microphone). The above is a summary of this Microsoft document. • Check the camcorder A/V output is set to DV Out. • Try both Firewire driver types: the native driver and the Legacy driver (as described above). Do that by “uninstalling” the IEEE1394 device driver from Windows Device Manager and shutting down, then restarting, your computer to return to the native driver.Poor Audio Quality
If you encounter poor audio quality before or after conversion of the DV files to MP4 (for example), experiment with Glagla’s DVDate by changung the DV type from 1 to 2, or 2 to 1, as appropriate. This worked for a user who had poor audio quality after using Handbrake to convert their DV files to MP4; see here for the VideoHelp topic.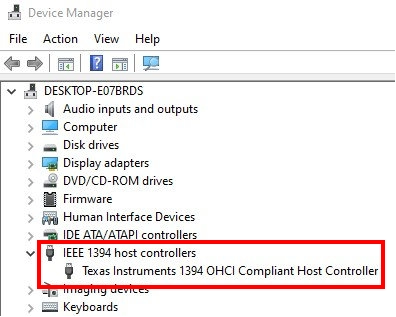

Page Links
Introduction Types of DV Cassette Formats Methods of DV Transfer Transfer Programs Problems/TroubleshootingDon’t have a camcorder? Read this!
If you are in the market for a MiniDV camcorder to transfer your Standard Definition MiniDV tapes (not HDV or Video8/Hi8/Digital8 tapes), jump straight to and read this section. You may be able to find a camcorder that has “DV over USB” functionality, negating the need for a Firewire connection on your computer.Introduction
I use the term “DV Transfer” to refer to the general process of transferring digital video from a tape- based or hard-disk-based camcorder using Firewire (IEEE1394), “DV over USB” or Thunderbolt. This results in a like-for-like digital copy of the tape on your PC. This means that the video, which is stored digitally on the tape, is simply transferred to the computer and not digitally converted on the way. This method retains the original quality. The process runs in realtime, so a 60 minute tape will take 60 minutes to transfer. This process includes transferring of analogue Video8/Hi8 tapes when using a Digital 8 camcorder, when the analogue video is converted to DV in the camcorder and output via the Firewire port.Types of DV
As far as consumer camcorders are concerned, there are two types of DV format ie codec. The first is “DV”, meaning standard definition video (for PAL, 720x576 at 4:3 or 16:9) using a DV codec such as DVSD. The files are in the AVI container/extension. The second is “HDV”, being high definition video ie 1440x1080i, in the MPEG codec (a camcorder example being the Canon HV20). The HDV files from the HV20 are in the M2T container/file extension. The two types are completely different and require different programs to transfer. The bitrate for DV is around 13GB/hour. The bitrate for HDV is also around 13GB/hour, despite the higher resolution, because the MPEG compression of HDV is more efficient.Cassette formats
The two cassette formats are:Digital 8
This cassette is the same as the Video8 and VideoHi8 cassettes and was implemented as a digital replacement to the video8 and VideoHi8 formats. Digital 8 camcorders record the video in digital format on these cassettes. Some Digital 8 camcorders can play Video8 and VideoHi8 tapes, converting the analogue video to DV in the camcorder, allowing transfer using Firewire.MiniDV
This cassette is smaller and can be used in both a standard definition camcorder and high definition camcorder.Methods of DV Transfer
Firewire
For some general information on Firewire, David Knarr has an expose on his Studio1 website. Be advised though that it does contain errors. Warning There have been instances of camcorders, in particular the Canon HV series of HDV camcorders, being “fried” due to improper plugging of cables. This is because the 6-pin plug carries power, and if the plugs are forced in the wrong way, the camcorder could be zapped. Be very careful when plugging in at both ends (camcorder and PC) to ensure the plug/s is/are oriented correctly. I always switch off the camcorder before connecting.Requirements
Your computer must have a Firewire/IEEE1394 port provided by a built-in port or a PCI/PCIe expansion card. If you are comfortable with adding PCIe cards to your computer, cheap Firewire cards are available from Amazon. I have a link to one such card in the Windows 11 section below. There are two Firewire standards: IEEE1394A and 1394B. The A standard is 400mb/sec and the later B standard is 800mb/sec. I don’t have any evidence to back up my hunch, but I suggest that 1394A (400mb/sec) cards are used. They are the cards with the small, 4-pin rectangular socket and the larger 6-pin socket which has a pointed top, similar to this: There are combination cards that have also have the newer Firewire-800 socket but I suggest not using those unless needed for a different device. Installation of the card is straightforward: with the PC off, plug it into any available PCI/e slot, depending on the exact card type, then reboot your PC.Windows 7
You should have no issues with connecting Firewire/DV video cameras.Windows 8/8.1
If you have problems connecting and accessing your DV camera, read this Microsoft article.Windows 10
Windows 10 is a bit of a problem child when it comes to Firewire. It ships with a driver that doesn’t work in many cases, and people have found that installing the “legacy” driver will get Firewire working. David Knarr has done extensive testing and concluded that a VIA-based firewire card is best for Win 10. Device Manager is the best location to see your Firewire driver details. This is the Windows 10 Default Firewire setup (I have an on-motherboard TI “card” in this particular machine): This is the Legacy driver for Windows 10 (the recommended driver if the default doesn’t work). Note the “(Legacy)” word: To install the legacy driver, follow the Startech Procedure here.Windows 11
Windows 11 appears to have improved support for Firewire, with no user action required to enable a Firewire card. As soon as Windows boots with the new card installed, the correct driver will be loaded. The current recommendation for Firewire cards in Win 11 is for a VIA chipset-based card. VIA cards can be identified by the letters “VIA” on the main chip, or “VIA” or “VT6315” in the description. The Firewire card which I have installed in my Win 11 PC and which worked “out of the box” is this cheap VIA-based card from Amazon, the Tunghey VIA PCIe Firewire card. I did not install the “legacy” Firewire driver. I simply installed the card and switched my computer on. This is my Device Manager entry (also observe the Imaging devices item; here, I have a Panasonic DV camcorder attached): It is worth noting that I initially fitted a Startech Firewire card (TI chipset-based) but I couldn’t get it to function at all.Firewire Cards that work with Win 10 and 11
The following cards are known to work without issues with Win 10 and Win 11 (no driver changes required): • Tunghey VIA PCIe card (or similar should be OK; note “VIA” on the main chip) • Linkstek VIA PCIe card (has the VIA VT6315 chip) and the same card on the AUS Amazon site.DV over USB - Direct from Camcorder
Some SD camcorders (not HDV) are able to output DV-over-USB. I have successfully tested DV-over-USB with the Panasonic NV-GS25 and GS300. The USB cable requires a USB type Mini B male plug for the camcorder and a USB type A male plug for the computer. For Panasonic camcorders, ensure the USB output is set to “Motion DV”: If your camcorder has a USB Mini B socket like this: I suggest you try plugging it into your computer; you may just be lucky enough to have a camcorder that will do DV-over-USB. After the camera has installed (no user drivers are necessary; Windows will provide them), check Device Manager for the “Video Edit” entry as shown here: This workflow is an option for laptops that don’t have a Firewire port. Use Scenalyzer to transfer. The camcorder will appear in the Scenalyzer Input droplist as “Video Edit”. For more information on DV-over-USB, see this YT video, which includes a list, in the description, of the camcorders known to have this feature.DV over USB - Pinnacle 500-USB and 710-USB
These analogue capture devices have the ability to transfer DV-using-USB, in a similar fashion to DV- over-USB, as described above. To summarise, the camcorder is connected to the 710-USB with Firewire and the 710-USB is connected to the PC with it’s USB cable. No special software is required, apart from the Pinnacle driver from here (use the Windows 7 64bit driver, assuming your system is 64 bit). While “710-USB” appears in the Scenalyzer device list, ensure you use the standard “Microsoft DV camera and VCR” device, as shown here: This workflow is an option for laptops that don’t have a Firewire port. Regarding the 710-USB, unfortunately, in my experience, for analogue capture it is becoming increasingly unreliable in Windows 10 and 11 and I cannot recommend it for that. It does however work well as a DV-over-USB device.DV over Thunderbolt
According to this Youtuber (and others), it is possible to set up a chain of cables (Camcorder>FW400>FW800>Thunderbolt 2>Thunderbolt 3>PC) that will allow a DV transfer into a Thunderbolt 3 port, depending on what model CPU you have. Read the video comments for more information on that. If you do not have access to any of the previous methods, this would be worth checking out. For Thunderbolt 4 machines, this option may no longer be available, as described here.Transfer Programs
For DV
My recommendation for standard definition DV transfer is Scenalyzer. It has proven to be the most reliable and also has some handy DV editing features such as splitting, trimming and joining clips. WinDV, for many years a great DV transfer program, was unreliable for me for a time with the later versions of Windows 10 but has recently started working correctly again with Windows 11. It is a less-featured program than Scenalyzer but does do DV transfer well.For HDV
Use HDVSplit.Problems/Troubleshooting
I have a MiniDV or Digital 8 camcorder but no
Firewire
Depending on the features of your camcorder, if you don’t have a Firewire socket on your PC and you can’t fit one, and you can’t use “DV-over-USB” as described above, you will be able to do an analogue “capture” using a USB digitiser such as the IO Data GV-USB2 (I have one and it works very well for analogue video captures). The capture quality is on a par with a DV transfer. In this case, the workflow follows the usual analogue capture workflow: Camcorder>S-Video cable (preferably, or else the yellow Composite cable) + audio > digitiser > PC. A DV transfer is preferable though. Here’s an example of a DV transfer (on the left) verses an analogue capture (on the right) of a MiniDV tape:DV camera not showing up in your transfer
program
• If using Windows 10 or 11, check that Windows has been given permission to use your camera and microphone: Windows Settings>Privacy & Security>Camera>turn on camera access and lower down the page, turn on “Let desktop apps access your camera”. Do the same for the microphone (click on Privacy and Security in the left margin to return to the main screen to access the Microphone). The above is a summary of this Microsoft document. • Check the camcorder A/V output is set to DV Out. • Try both Firewire driver types: the native driver and the Legacy driver (as described above). Do that by “uninstalling” the IEEE1394 device driver from Windows Device Manager and shutting down, then restarting, your computer to return to the native driver.Poor Audio Quality
If you encounter poor audio quality before or after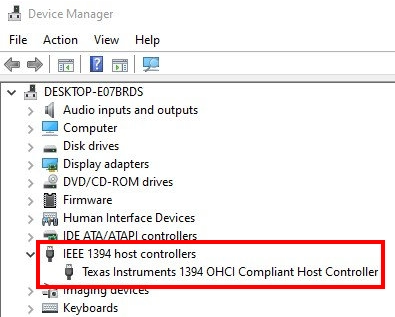


DV Transfer


- AA Prods Home
- AmaRecTV
- AVIDemux
- DV Transfer Info
- Elgato Digitiser
- Eudora
- Graphstudio
- Handbrake
- HDVSplit
- HUFFYUV Codec Installation
- IOData GV-USB2 Info
- Magix Movie Studio
- Panasonic ES15 Setup
- Scenalyzer
- Virtual Dub
- Video8-Hi8-Digital8 Info
- Video Restoration Scenarios
- Virtual Dub Histogram
- Video Stabilisation
- WinDV