Thanks to @Jagabo at Videohelp, who provided the Graphstudio setup information for this tute.
General
Brightness and Contrast levels at the capture stage are important because, if they are too bright or too dark, no information is captured in the super dark and super white areas and it therefore cannot be retrieved in post-capture processing. This tute covers the setting of the brightness and contrast (the levels) using the histogram feature of Virtual Dub. Note that VDub does not actually have to be used to capture; it can be used only to set the levels, then another program can be used to do the actual capture. I do this when capturing with AmaRecTV. Instructions for settings up Virtual Dub are on my website here. Only the Installation section is relevant, and to run Virtual Dub simply double-click on either the virtualdub.exe or virtualdub64.exe files. It is worth noting that the histogram is not the be-all-and-end-all to the setting of the levels. Use your eyes as well to tweak the contrast, especially, so that you can see all the details in the really dark and light areas. What is a “Proc Amp”? It’s a “processing amplifier” and is used, in this context, to adjust the levels for video capture. A proc amp can be a hardware box or a software control, as shown in the first image below. For example, I use a DVK- 200 box as a frame TBC, and use the physical controls on the front to adjust the levels. Software proc amps are accessed through the digitiser’s settings panel, which in turn is accessed through the capture software. I have created a Youtube video on this topic; the link is at the bottom of this page.Accessing the Video Proc Amp/Levels prior to/during Recording
Some digitisers do not permit levels adjustments of the digitiser’s software proc amp using the technique described here when Virtual Dub is actually recording. Or, the incoming picture or histogram may freeze when you try. This can be easily overcome by using Graphstudio to get access to the Proc Amp. See my tute on this here.Setting the Brightness and Contrast (the “Levels”)
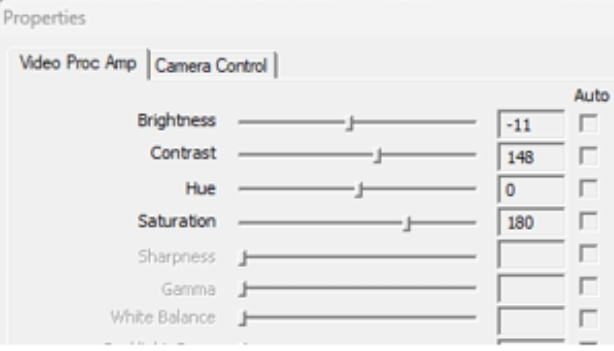
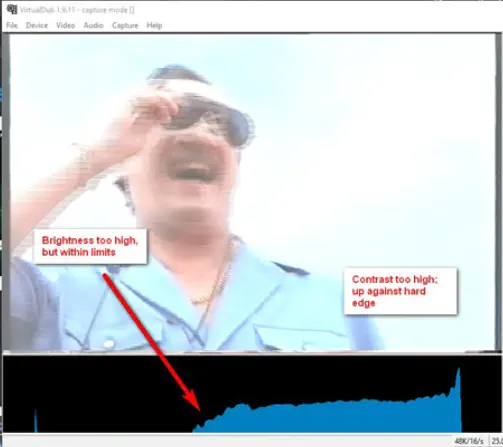
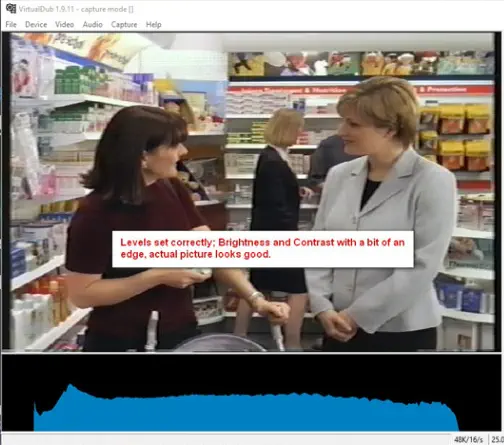
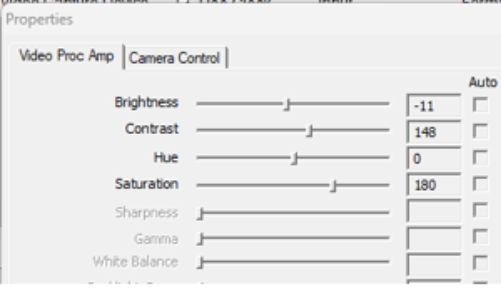
Here's how to set the brightness and contrast: • Start VDub and go into Capture mode (File>Capture AVI or Capture>Capture AVI). • On the Video Menu, set Enable the Histogram (Video>Histogram). The black histogram window will appear at the bottom of the video window. You should see some light blue signal colour. Note: Depending on your digitiser, you may also need to set Video>Preview to get the histogram to show. • Play your tape. You’ll see the histogram signal jumping around as the scene brightness changes. If you want to be super-accurate with your settings, temporarily crop away the black borders, but remember to reinstate them for the actual capture. • Adjust the Brightness and Contrast levels with the proc amp. In VDub, go Video>Capture Filter>Video Proc Amp tab. This is a typical software Proc Amp: If you can’t use the controls eg if Histogram and video are frozen, or “not available” messages appear, refer to use of the “Graphstudio” program on this website here. The Brightness slider controls the left end of the histogram and the Contrast slider controls the right end. Set the brightness first, because it moves the whole histogram. Adjust each to stay within the limits. The limits may be shown by a red mark. Mine aren’t, but if you overcook either then you’ll see the hard limit/edge the digitiser is bumping up against and then you can decrease the contrast or increase the brightness to adjust the level by bringing the edge inward a little. I think my digitiser (GV-USB2) only captures 16-235; that’s why there is a black no-go area on each end of the histogram. On the subject of proc amps, it is suggested that the other controls eg Hue, Sharpness, are left at default and those items be adjusted in post-capture processing (POST).Youtube video of this section:


Thanks to @Jagabo at Videohelp, who provided the
Graphstudio setup information for this tute.
General
Brightness and Contrast levels at the capture stage are important because, if they are too bright or too dark, no information is captured in the super dark and super white areas and it therefore cannot be retrieved in post-capture processing. This tute covers the setting of the brightness and contrast (the levels) using the histogram feature of Virtual Dub. Note that VDub does not actually have to be used to capture; it can be used only to set the levels, then another program can be used to do the actual capture. I do this when capturing with AmaRecTV. Instructions for settings up Virtual Dub are on my website here. Only the Installation section is relevant, and to run Virtual Dub simply double-click on either the virtualdub.exe or virtualdub64.exe files. It is worth noting that the histogram is not the be-all- and-end-all to the setting of the levels. Use your eyes as well to tweak the contrast, especially, so that you can see all the details in the really dark and light areas. What is a “Proc Amp”? It’s a “processing amplifier” and is used, in this context, to adjust the levels for video capture. A proc amp can be a hardware box or a software control, as shown in the first image below. For example, I use a DVK-200 box as a frame TBC, and use the physical controls on the front to adjust the levels. Software proc amps are accessed through the digitiser’s settings panel, which in turn is accessed through the capture software. I have created a Youtube video on this topic; the link is at the bottom of this page.Accessing the Video Proc Amp/Levels
prior to/during Recording
Some digitisers do not permit levels adjustments of the digitiser’s software proc amp using the technique described here when Virtual Dub is actually recording. Or, the incoming picture or histogram may freeze when you try. This can be easily overcome by using Graphstudio to get access to the Proc Amp. See my tute on this here.Setting the Brightness and Contrast (the
“Levels”)
Here's how to set the brightness and contrast: • Start VDub and go into Capture mode (File>Capture AVI or Capture>Capture AVI). • On the Video Menu, set Enable the Histogram (Video>Histogram). The black histogram window will appear at the bottom of the video window. You should see some light blue signal colour. Note: Depending on your digitiser, you may also need to set Video>Preview to get the histogram to show. • Play your tape. You’ll see the histogram signal jumping around as the scene brightness changes. If you want to be super-accurate with your settings, temporarily crop away the black borders, but remember to reinstate them for the actual capture. • Adjust the Brightness and Contrast levels with the proc amp. In VDub, go Video>Capture Filter>Video Proc Amp tab. This is a typical software Proc Amp: If you can’t use the controls eg if Histogram and video are frozen, or “not available” messages appear, refer to use of the “Graphstudio” program on this website here. The Brightness slider controls the left end of the histogram and the Contrast slider controls the right end. Set the brightness first, because it moves the whole histogram. Adjust each to stay within the limits. The limits may be shown by a red mark. Mine aren’t, but if you overcook either then you’ll see the hard limit/edge the digitiser is bumping up against and then you can decrease the contrast or increase the brightness to adjust the level by bringing the edge inward a little. I think my digitiser (GV-USB2) only captures 16-235; that’s why there is a black no-go area on each end of the histogram. On the subject of proc amps, it is suggested that the other controls eg Hue, Sharpness, are left at default and those items be adjusted in post-capture processing (POST).Youtube video of this section:


- AA Prods Home
- AmaRecTV
- AVIDemux
- DV Transfer Info
- Elgato Digitiser
- Eudora
- Graphstudio
- Handbrake
- HDVSplit
- HUFFYUV Codec Installation
- IOData GV-USB2 Info
- Magix Movie Studio
- Panasonic ES15 Setup
- Scenalyzer
- Virtual Dub
- Video8-Hi8-Digital8 Info
- Video Restoration Scenarios
- Virtual Dub Histogram
- Video Stabilisation
- WinDV
Virtual Dub Histogram


Virtual Dub Histogram

